DotNETifying Sign in with Apple
19.06.2020
On the annual Worldwide Developers Conference (WWDC) 2019, Apple announced their “OAuth” way of authenticating users using their Apple ID called Sign in with Apple. I have purposely put the term “OAuth” in brackets because Apple has not mentioned it anywhere explicitly (or at least not publicly), but as you will see they are using parts of OAuth’s 2.0 OpenID Connect (OIDC).
I will focus mainly on implementing Sign in with Apple using .NET and Apple’s REST API endpoints, but I will also show you a much more simple approach using a .netstandard 2.0 library that I have created called AppleAuth.NET. It requires just a few lines of code to retrieve an authorization token from Apple. Also, it shields you from some nerve-racking errors that you might face when implementing everything by yourself. Here is a link to the NuGet package. You can also explore the source code on GitHub.
One small, but notable detail is that apps that use third-party or social login service (such as Facebook Login, Google Sign-In, Sign in with Twitter, etc.) are required to also implement Sign in with Apple as an equivalent option.
The OAuth flow
First and foremost, let’s quickly go through the UI flow.
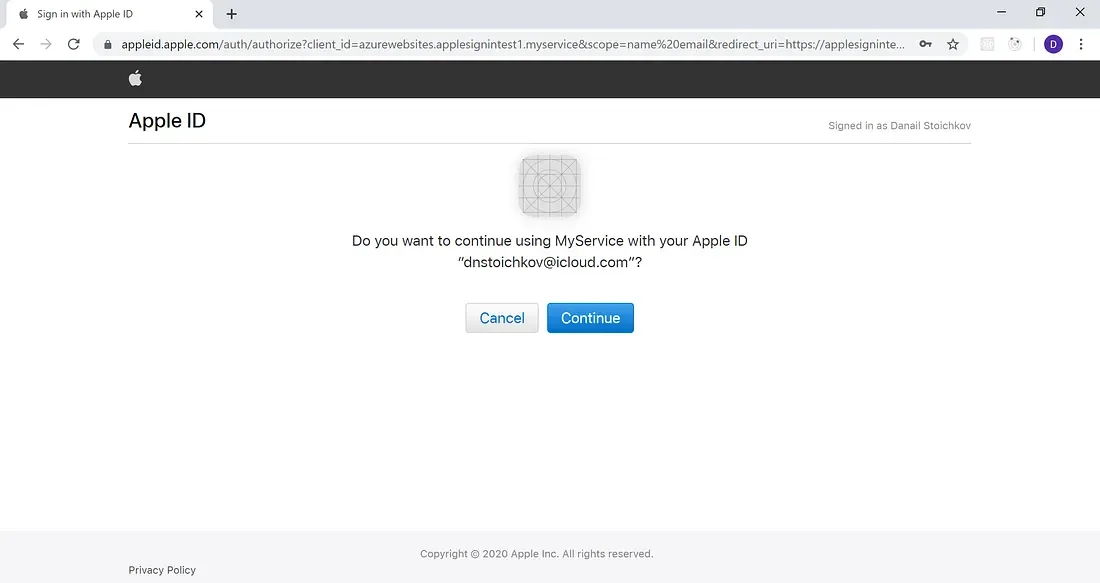
The process starts with the user clicking on the Sign in with Apple button, which redirects them to Apple ID sign in page. Once they fill in their Apple ID and password, they will see a confirmation screen asking them if they want to proceed to your app or service using Apple ID:
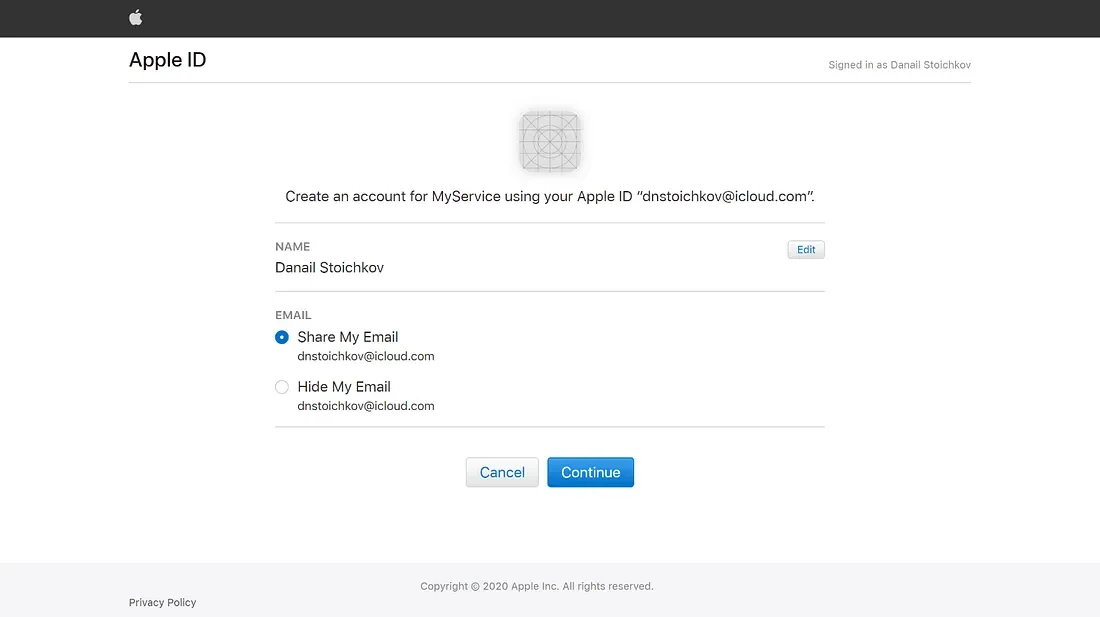
When users are signing in for the very first time they will be asked if they want to share their email with you. Here comes a cool privacy- related feature which lets users remain anonymous (or sort of) and not share their Apple ID Emails with your app.
So how can you send them updates with latest news, events, and promotions? Well, for this Apple has presented their so called Private Email Relay Service. It acts as some sort of a middleware that facilitates communication between you and the user. It can be configured from the Developer portal, but we will not be focusing on it… at least not today.
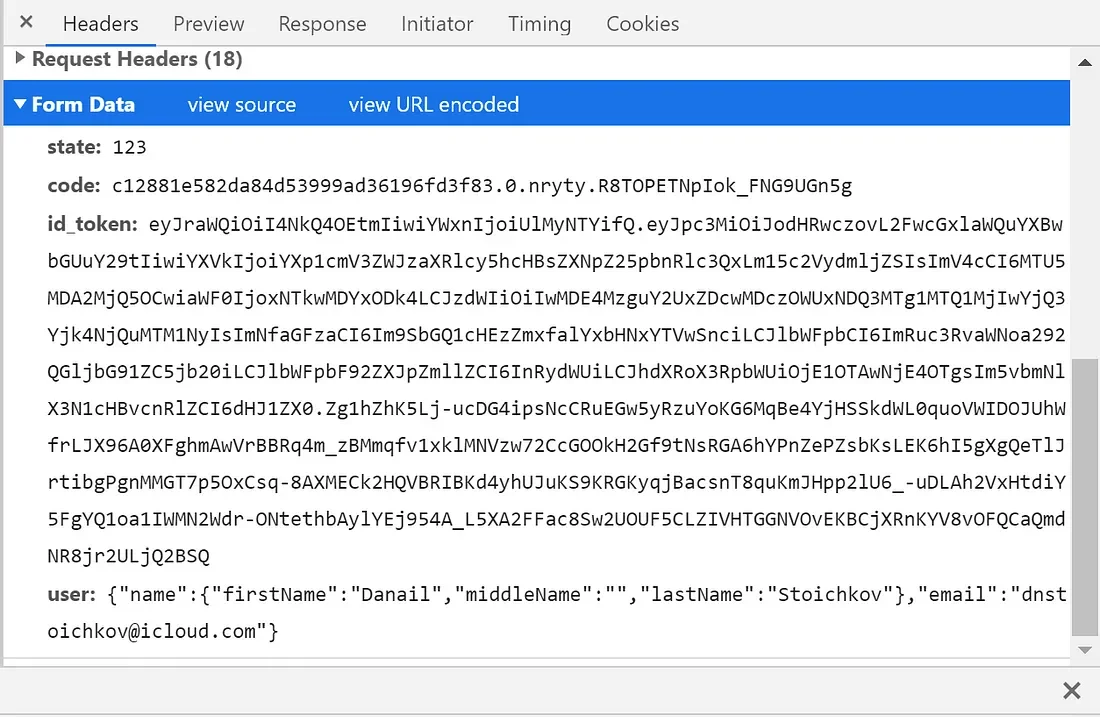
After clicking continue Apple will make an application/x-www-form-urlencoded POST request to the Redirect URL that you have specified in the Developer portal (we will set up the Redirect URL in a moment). The request contains information about the user in a JSON format, id_token which is an initial JSON Web Token and code which can be used for retrieving an actual authorization token.
"Because he's not our hero. He's a silent guardian. A watchful protector..."
As I mentioned earlier, I will show you how to implement Sign in with Apple using AppleAuth.NET. I personally recommend using this approach since it will save you much of the hassle and it should make your implementation cleaner and more readable.
To install the package, execute the following command in your Package Manager Console:
PM> Install-Package AppleAuth.NET
Alternatively, just install the package using NuGet package manager.
Add the needed using statements at the top:
using AppleAuth;
using AppleAuth.TokenObjects;
As I mentioned in the beginning once the user signs in into your app Apple will make an application/x-www-form-urlencoded POST request to your Redirect URL. Here is an example method located on a Redirect URL endpoint, that handles the request object received from Apple and retrieves an authorization token.
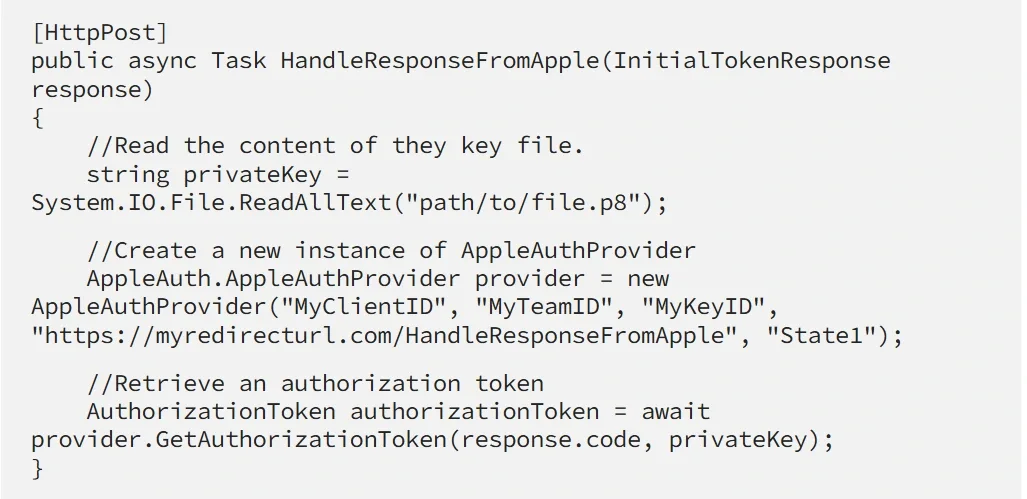
What this method does is:
- Reads the contents of the .p8 file containing the private key (or alternatively you can hard-code the key string).
- Creates a new instance of AppleAuthProvider, which requires as parameters your Client ID, Team ID, Key ID, Redirect URL.
- Call the GetAuthorizationToken method with the code received from Apple and the privateKey. An AuthorizationToken object is returned that contains all of the information returned from Apple.
Keep in mind that Apple’s tokens are short-lived so you should either store this token somewhere or create a user (or a session) within your app.
You can use the GetRefreshToken method to obtain a refresh token and check if the user is still using Sign in with Apple for your app or service. Here is an example that returns a Boolean to check if the user is still signed in:
We are doing the same thing as with GetAuthorizationToken with the only difference that we are sending the RefreshToken from the already received AuthorizationToken from GetAuthorizationToken.
You can use the GetButtonHref method to retrieve a URL string for the href attribute of your Sign in with Apple button.
If you want to display the Apple’s sign in page as popup, or you want to apply some style changes to the buttons, or you want to handle the response from Apple directly in your page using JavaScript. You can follow the guidelines from Apple.
Here is a sample HTML for displaying the Sign in with Apple button:
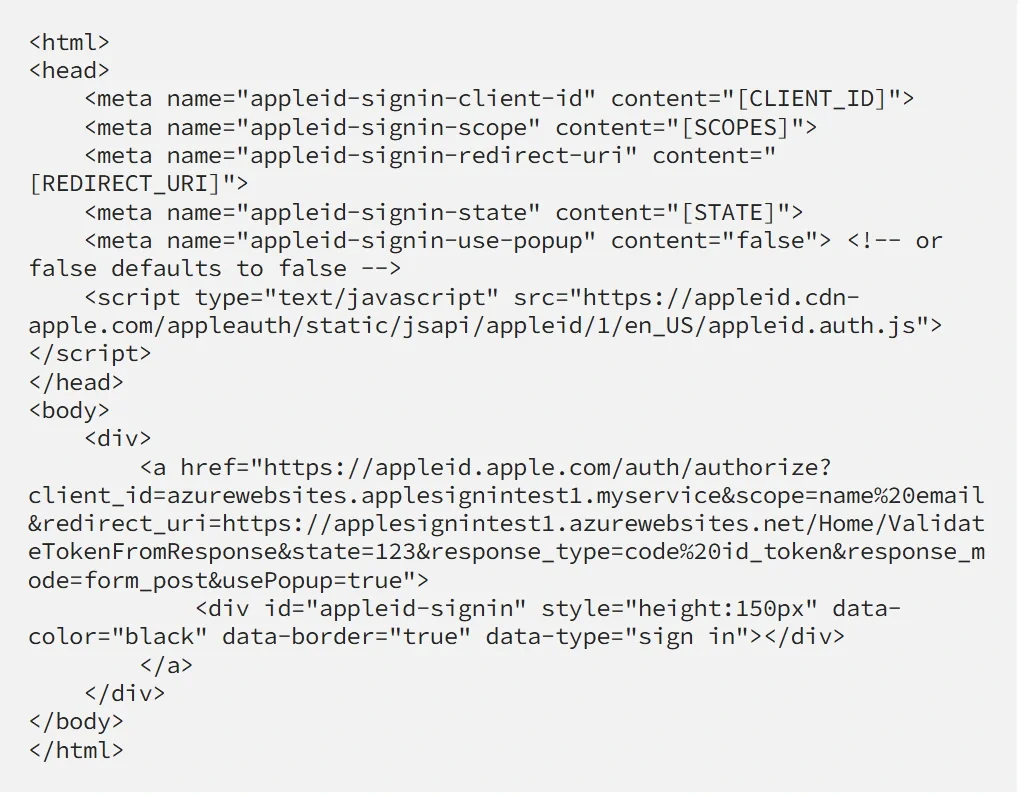
Apple has also introduced the use of nonce (“Number-used-ONCE”). A nonce can be anything besides a number (like a unique string or a hash made up of numbers and strings) and it is used to identify each call to the API in order to mitigate replay attacks. You can put a new unique nonce as part of the query string of every client request. Then, you should get the same nonce as a response in the payload after you deserialize the JWT token from Apple. The nonce is not a required parameter.
Configure Sign in with Apple in the Developer Portal
So, before displaying the Sign in with Apple button we need to set up some configurations in the portal, which we are going to use through the whole flow.
Create an App ID
The first identifier that we must create is an App ID. As the name clearly implies it’s just an identifier for an app (or a set off apps… you will see that in a moment). Go to Certificates, Identifiers & Profiles > Identifiers and click on the plus icon next to the Identifiers heading.

Fill in a description and Bundle ID. The description is just to know what this identifier is used for. Apple suggests setting a reverse-DNS style string as Bundle ID. I have created a small web app in Azure which will handle the sign in flow, so I will just use its DNS.
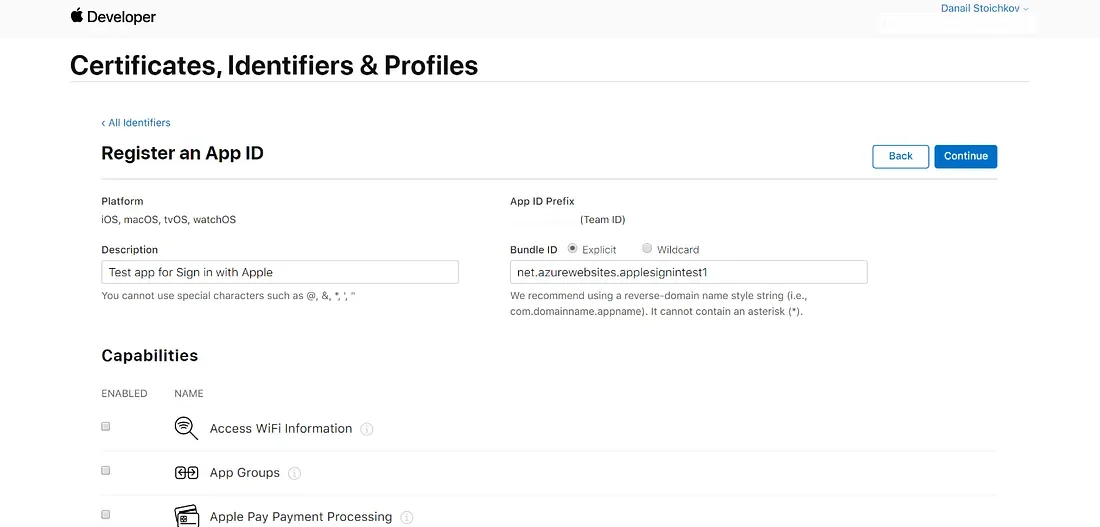
Make sure you also check the Sign in with Apple checkbox from the list of capabilities that your app will have.

Create Services ID
The Services ID is used for identifying a specific service or an app. The App ID acts as some sort of a grouping identifier for one or more apps which can be individually identified by a Services ID. As an example, imagine you have a platform that has different apps for mobile, desktop and web. You can group all the apps with an App ID and you can create different Services IDs for each individual app.
To create Services ID, click again on the blue plus icon and select Services IDs from the list of identifiers. Click continue and fill in Description and Identifier and hit Continue and Register. It’s important to note that the Description is also the name of your service which users are going to see when they get redirected to the Apple ID sign in page.

Set up Redirect URL
After you have registered your Services ID click on it and select Sign in with Apple checkbox. After clicking on the Configure button you will see a popup in which you have to specify the URL that your app or service will be running on and also configure the Redirect URL that will be handling the OAuth flow. The Redirect URL should be a real domain, so using localhost or an IP address will not work. For this example, I have set up a small ASP.NET MVC app located in an azure App Service that will handle the response from Apple.
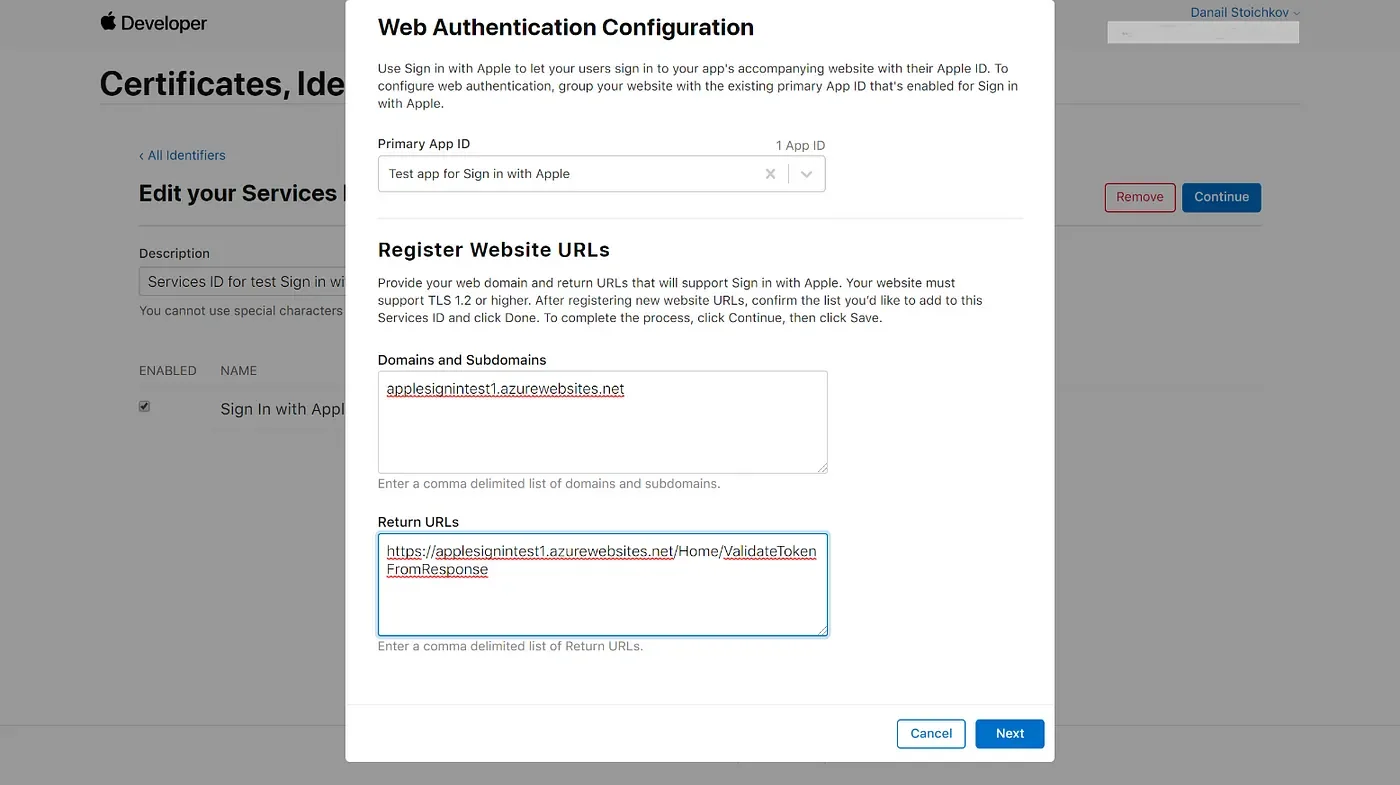
Click Next and then Save.
Create Private Key
Apple has chosen to use the ubiquitous public/private key cryptography (or asymmetric cryptography) for signing JSON Web Tokens, so that’s why we need to create our private key.
So, again from Certificates, Identifiers & Profile, choose Keys from the side navigation. Set a name for the Key, select the checkbox for Sign in with Apple, and click on the Configure button. Choose your primary App ID and hit Save.
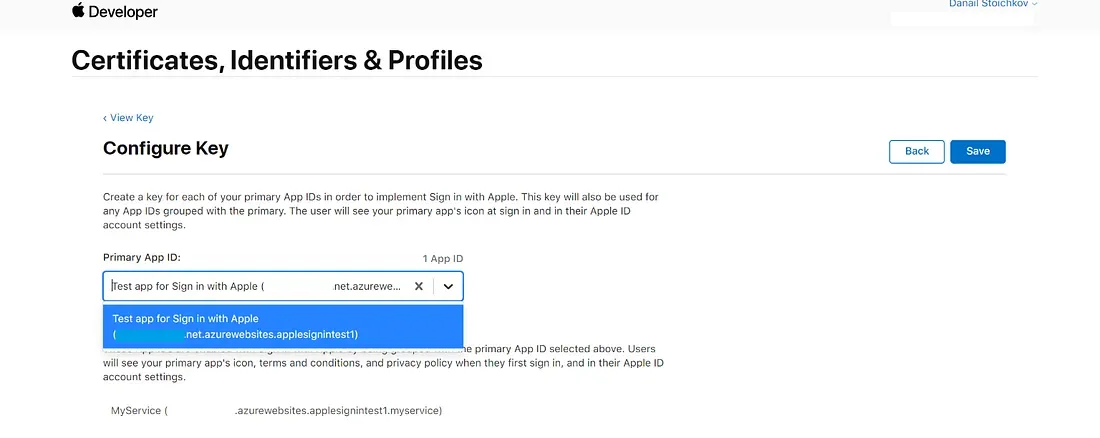
Aaand… That’s all Folks! Now that we have all four of the mighty configurations in place, we are all set to throw in some code. Here’s a quick checklist for you to doublecheck.
- We have created an App ID.
- We have created a Services ID.
- We have set up our Redirect URL that will retrieve our authorization token.
- And we have created a Private Key for signing the JWT.
Generating the client_secret
So, let’s finally write some code and create the JSON Web Token that will be used as the client_secret field in the request body.
The client_secret contains a header and a payload, and it is signed using the Elliptic Curve Digital Signature Algorithm (ECDSA) with the P-256 curve and the SHA-256 hash algorithm. For the signature, we will use the private key that we generated from the portal. We are going to use System.Security.Cryptography.Cng and Microsoft.IdentityModel.Tokens.Jwt libraries to import the private key and to create and sign the JSON Web Token. Also, we will use System.Security.Claims namespace to create a new List that will serve as the claims payload.
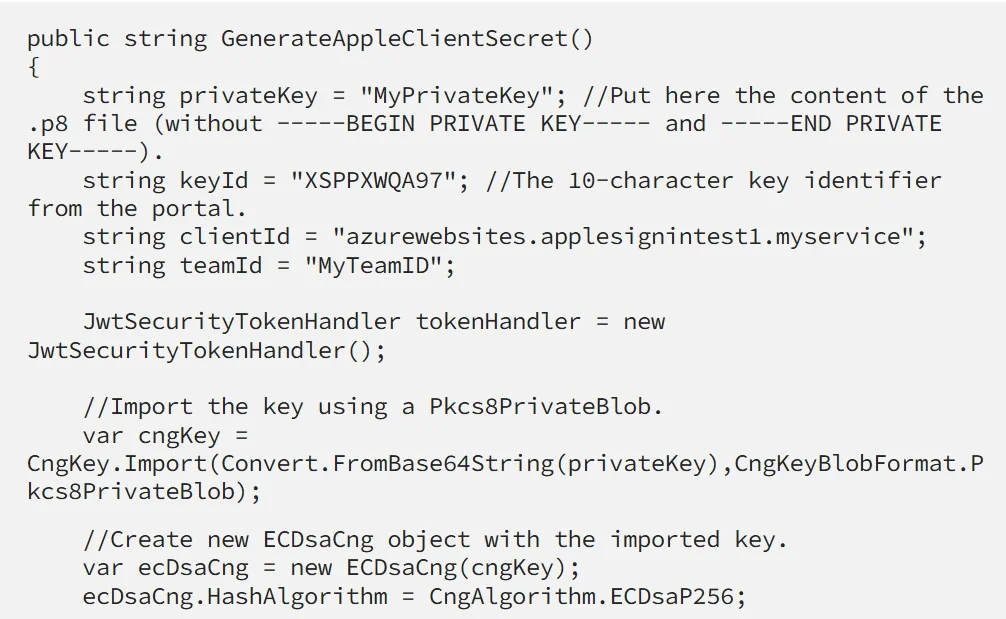
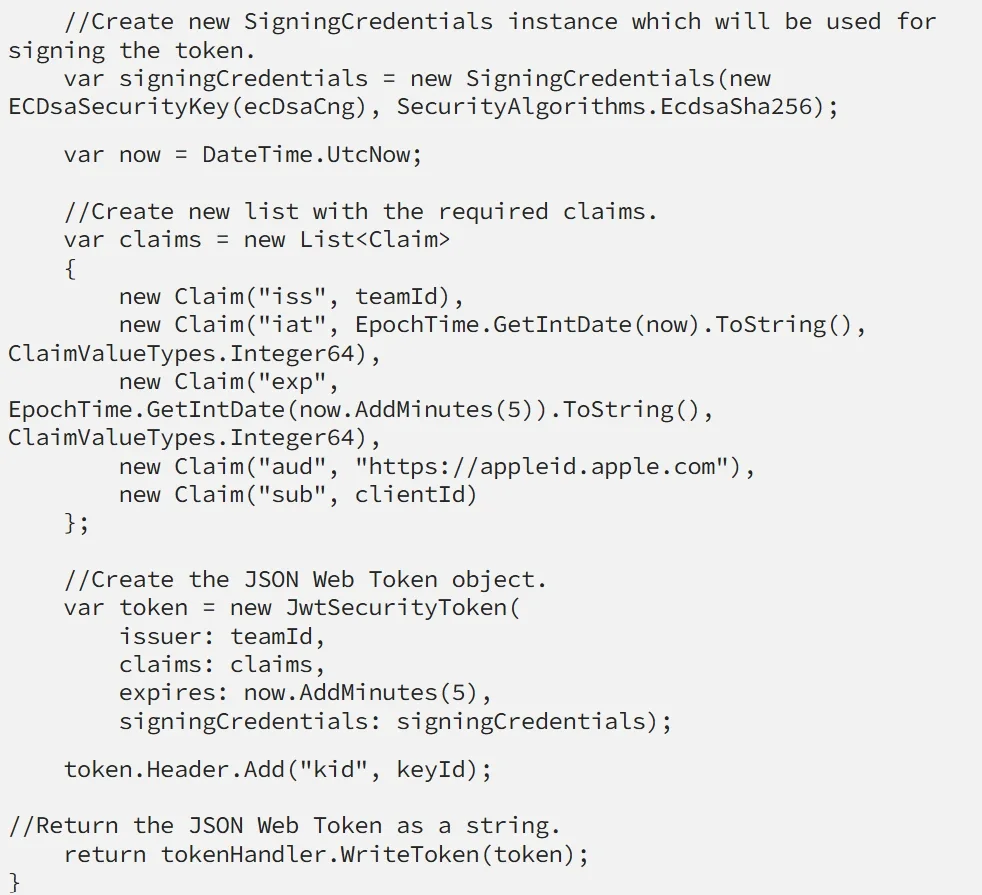
Let me quickly walk you through what I have done here.
I am importing the key using CngKey.Import() method that requires as parameters the private key as byte array and CngKeyBlobFormat (this format is used to specify how the key should be imported. Our private key is in ASN.1 PKCS 8 Information Syntax Standard, so we should use CngKeyBlobFormat.Pkcs8PrivateBlob).
After that, I have created a System.Security.Cryptography.ECDsaCng object (which provides an implementation of the Elliptic Curve Digital Signature Algorithm) and I have specified System.Security.Cryptography.CngAlgorithm. ECDsaP256 which is simply the Elliptic Curve Digital Signature Algorithm (ECDSA) with the P-256 curve.
Then I am creating a new instance of Microsoft.IdentityModel.Tokens.SigningCredentials which I pass to the System.IdentityModel.Tokens.Jwt.JwtSecurityToken object, which knows what to do with it and how to sign the token.
A list of the claims that I have added to the JwtSecurityToken instance can be found in Apple’s documentation.
Creating the request message
Whenever a user signs in to our app Apple will make a POST request to the already specified Redirect URL. A successful request contains the state (which we specify as part of the query string for the Sign in with Apple button), code which we use to obtain an actual authorization token, and an id_token which is a JWT that contains information about the user.
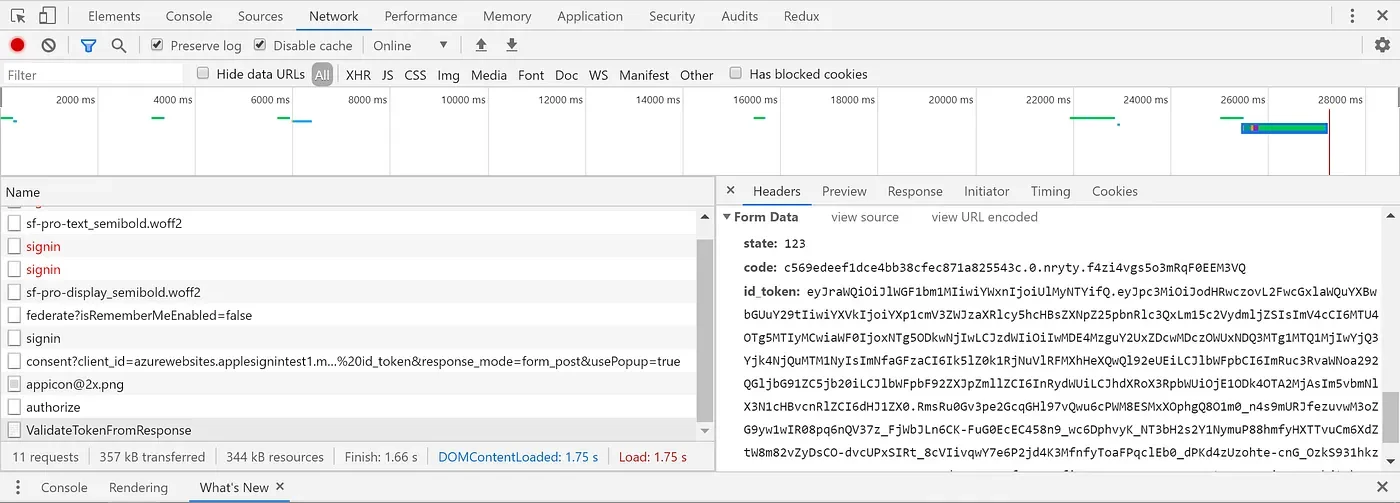
After we receive the authorization code, we can make a new HTTP POST request to retrieve an actual authorization token.
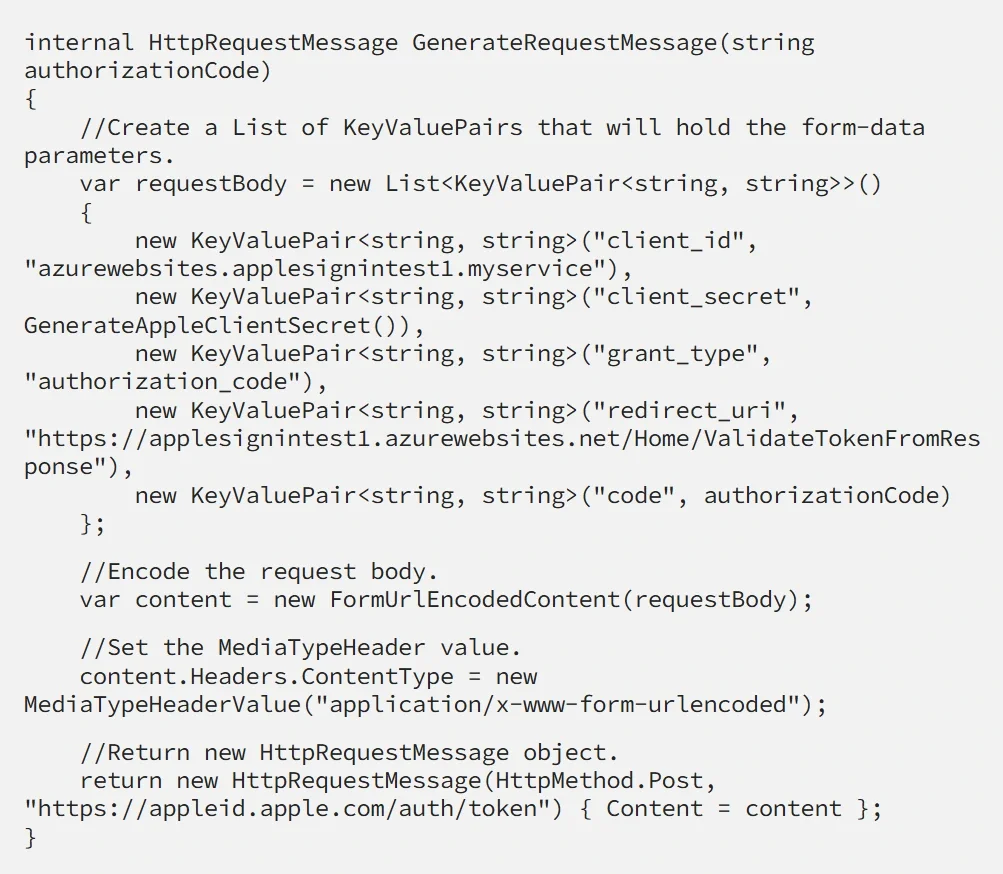
Apple will expect that you send them an application/x-www-form-urlencoded request containing:
- client_id which is the Client ID from Apple Portal.
- client_secret which is the JWT that we generate using our GenerateAppleClientSecret method.
- grant_type which should be set to either “authorization_code” (which denotes an authorization token) or “refresh_token”, which we can use to verify that the user is still using Apple ID to sign into our platform. It’s a good idea not to request a refresh_token more than once a day for a single user because Apple might throttle your requests.
- redirect_uri which we have already specified in the Apple portal.
- code which is the authorization code that we received from the initial request.
Now just send this request to Apple’s authorization endpoint: https://appleid.apple.com/auth/token.
Further information on the details of the request can be found here.
Receiving an authorization token
And voilà! If you have done the previous steps correctly then you will receive the following response from Apple:

The response contains a refresh_token which you can use to verify if a user is still using sign-in with Apple. Just make the same HTTP POST request that we made earlier but set grant_type to “refresh_token” and use the value of refresh_token for the code field.
You can decode the JWT from the id_token field to get more information about the user:
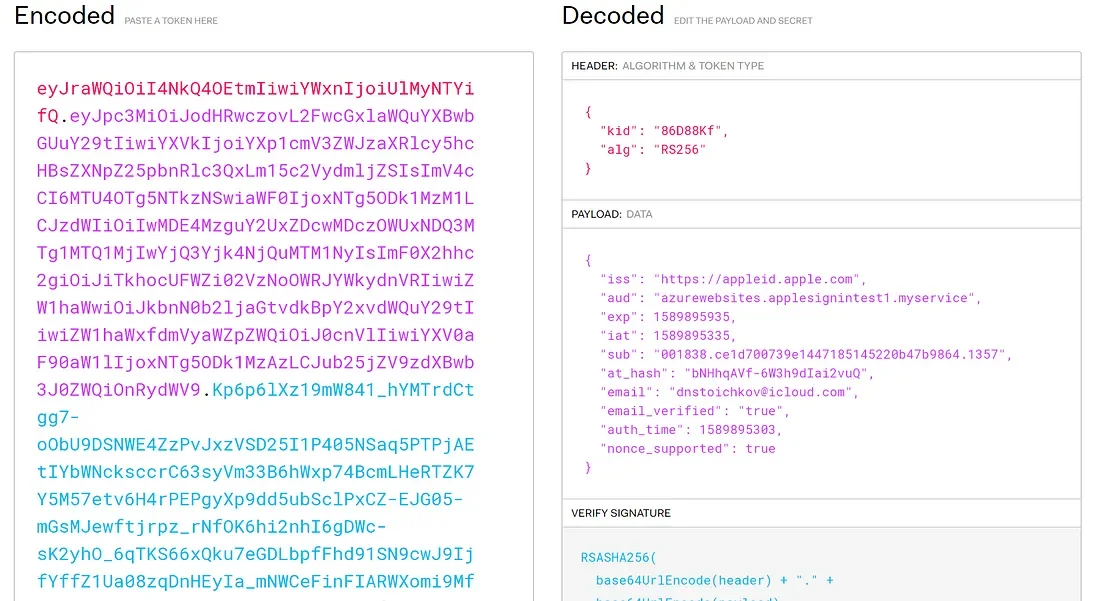
There are a few error codes that you can receive from the authorization endpoint that can really make you bang your head against the wall. You can see a list of each one with a description.
Probably the most annoying one is invalid_client, which can be caused by many missteps in the process. Some examples are an invalid client_secret, or more specifically an invalid signature of the JWT. Also, an invalid expiration time, or issued at the time, or simply a typo in the client_id can be.
Verify the received token
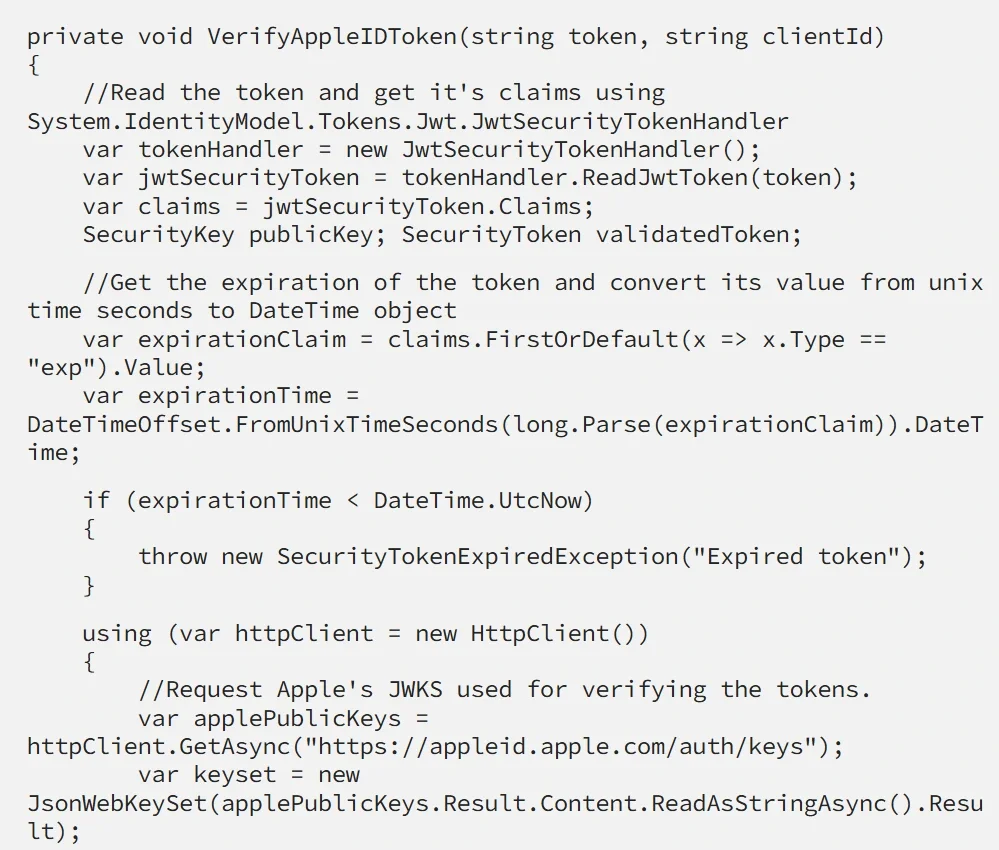
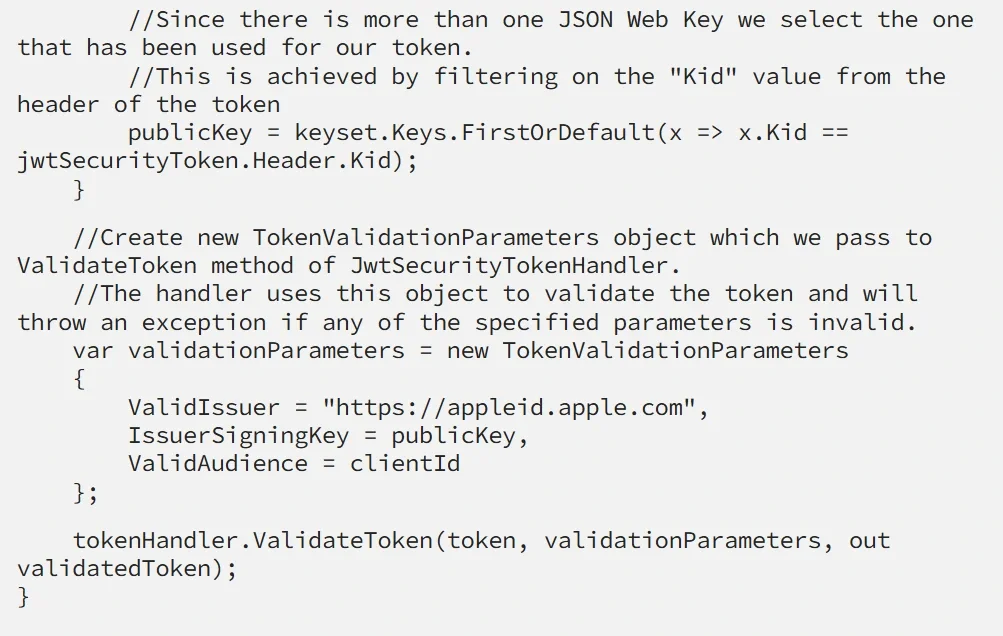
It is a good idea to verify the token received from Apple ID’s servers to make sure it is valid and is indeed sent from Apple. For this purpose, Apple has an endpoint: https://appleid.apple.com/auth/keys for retrieving a set of JSON Web Keys used for verification.
If you are using AppleAuth.NET this will be done for you every time you request a new token.
Here is a sample code for verifying the authorization token:
Conclusion
As you can see there are quite a few steps that you have to go through to solve the “Sign in with apple” riddle. If you really want to play around with some HTTP requests, ECDSAs, and JSON Web Tokens you certainly can. But if you want to skip writing so much boilerplate and just get Sign in with Apple up and running then use AppleAuth.NET.
I would really appreciate any feedback and contributions to make AppleAuth.NET better, faster, and stronger!
Also, if you are more of a visual learner, you can check out my video tutorial:
How to Dotnetify Sign in with Apple